Discover Free Pool Billiards Instruction Here!
Discover Free Pool Billiards Instruction Here! Pictures with Text Explanations make it Simple to learn the Basics.
Subscribe to Blog on the left and Stay up to Date with this Site. Click the red Link or use the yahoo or Google buttons.
Welcome Back. Let's Continue below with Part 1 of the 7 Day Basic training for the fundamentals of playing pool and Billiards. Scroll down and check out the Pictures and then refer to the text.
"Pool Billiards Instruction" is designed to Inform, and then Train You.


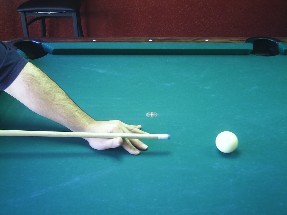
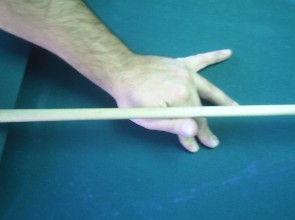
The pictures above show what many refer to as an open bridge.
Can You See how my Hand (palm) is resting flat on the table? Pay attention to how My Fingers are spread out for stability. Notice that My Thumb forms a Channel for the pool Cue to slide through.
You will notice my fingers almost standing on the table in the picture to the right. This is how you get high, low or middle (center) English on the Cue ball. Press fingers to table lifting hand for high and center. Flatten hand for low.
I do not recommend this bridge for most shots. I use it when stroking the ball extremely soft. (safeties and slow roll shots) This bridge is also handy for shooting over other balls and jump shots.
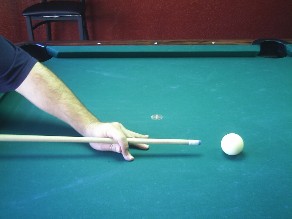
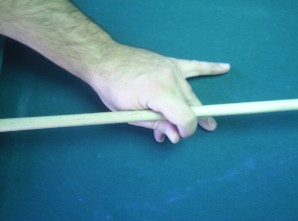
The next bridge we will talk about is the Tri-Pod Bridge. You make this bridge by starting with the Open Bridge (pictured above) and then wrapping Your Pointing Finger (next to Thumb) around the cue to touch Your Thumb. You then slide Your Middle finger (A.K.A. Bird) under the Thumb and Pointing finger.
Study the diagram below and practice forming this bridge around your cue.
Practice the "Pool Billiards Instruction" Techniques and make them Your Own.


The finger that you see in the picture to the right which is under my thumb is my middle finger. If you have never used the Tri-Pod Bridge, it will be uncomfortable in the beginning. Don't worry with a little practice, using it will become second nature.
Pool Billiards Instruction Below!
The Tri-Pod Bridge allows much more stability for your stroke. This bridge is a must for long straight stop or draw shots. Extreme follow shots are also much easier to control using this bridge.We will define these shots in your second email installment. You will receive this, 6 days after the first one.
As with the open bridge you can raise the cue up and down on the cue ball by using your fingers against the table.
Let's review what we have learned in Your first email installment.
Pool Billiards Instruction Knowledge List Below.
- How to grip and Hold your Cue with Stroke Hand.
- How to find the balance point on your pool Cue.
- Where to hold your Cue. (2 inches back from balance )
- How to Position your Feet and Stand.
- How to line Your Body up with the shot.
- How to Build an open Bridge with Your bridge Hand.
- How to build a Tri-Pod Bridge.
This will give you plenty to work on until your second email installment arrives.
Practice these Fundamentals. You will need to know them in order to complete this training course.
The Video Below is the same as the video from the previous lesson. The video shows the open and closed bridges nicely.
Discover the Billiards Planet! Free Subscription. Fill out the form below.

Find out about the Secrets in 8 Ball Winning Strategies Here.


